Tampilkan postingan dengan label Photo Shop. Tampilkan semua postingan

9 November 2011

Reader Tutorial: Flaming Car in Photoshop by Lincoln Soares

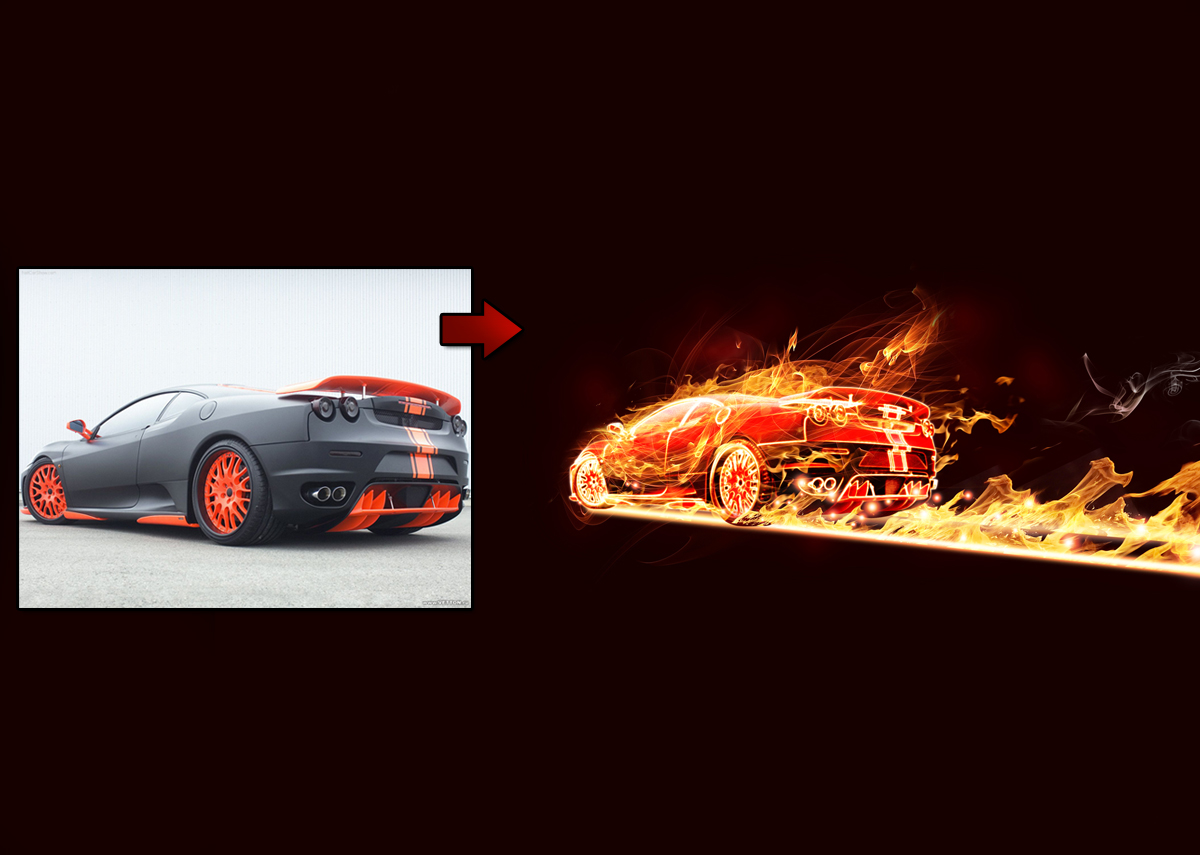
This week’s tutorial we will show you how to create a flaming car. We saw this effect before and it’s quite simple but it’s a good exercise and the result is quite good. You can also apply this effect on other images.

So let’s do that.

Step 1

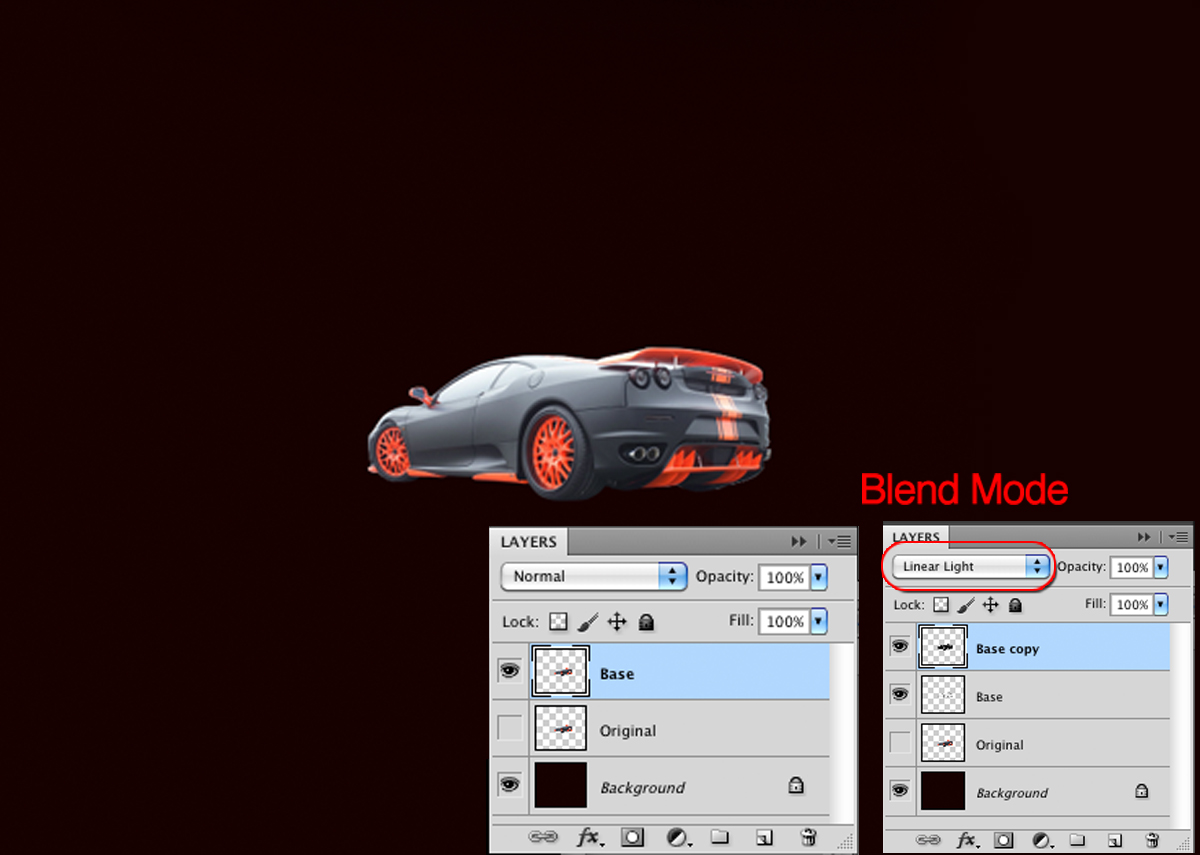
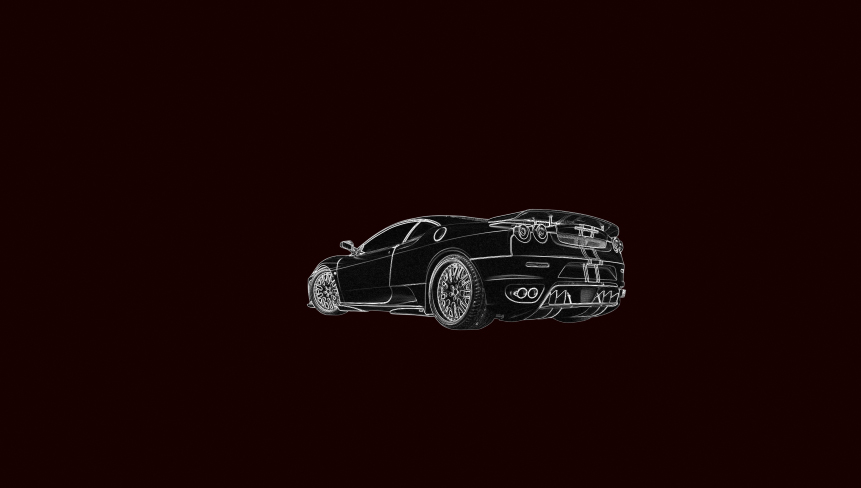
Open Photoshop and create a new document. Make the background with a mix of black and red (#160000). Then with the image of a car with no background. For this first step the idea is get the outlines of the car for our image. To do that, it's pretty easy. Create a new layer by duplicating the car's layer. Rename it to "Base" and hide the original. Go to Image>Adjustments>Invert.
After that go to Filter>Stylize>Find Edges. Repeat the same thing again in order to have another layer but for the Blend Mode use Hard Light. After that you can merge those 2 layers into one.
Reader Tutorial: Flaming Car by Lincoln Soares

Step 2

Your image will look like this:
Reader Tutorial: Flaming Car by Lincoln Soares

Step 3

Now that we've gotten the cars outline we will have to apply the light effect on it so it will look like a flaming car.
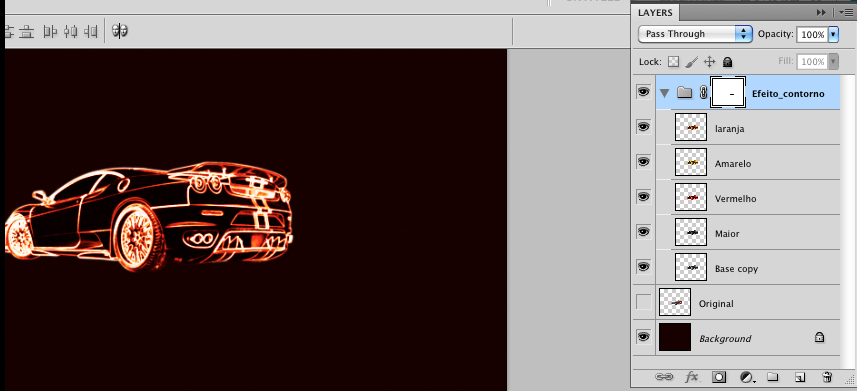
In the same layer that we created in the step 1, let's apply a Gaussian Blur. Go to Filter>Blur>Gaussian Blur. The value will vary depending on the resolution you are working on. In my case I used 1.6 for the Radius. After that change the Blend Mode to Scree.
Duplicate the the layer keeping the same blend mode, however let's apply a Gaussian Blur again, go to Fitler>Blur>Gaussian Blur and use 3.6 pixels. Rename this layer to "Top". Duplicate the layer we created in the first step and merge it down with this one. Then duplicate the first layer again and rename it to Red and go to Image>Adjustments>Hue and Saturation. Select Colorize and change the Saturation to 100. The Blend Mode of this layer will be Overlay.
Let's repeat this again to create the yellow version. Go to Image>Adjustments>Hue and Saturation and use 40 for the Hue. Do the same again to create an orange version, then for the Hue and Saturation use -22.
After that change the Opacity of the yellow and orange layers to 50% and put them inside a folder. You can do that by selection both and going to Layer>Group Layers. Then with the group select go to Layer>Vector Mask and then delete the outlines on the rear part of the car.
Reader Tutorial: Flaming Car by Lincoln Soares

Step 4

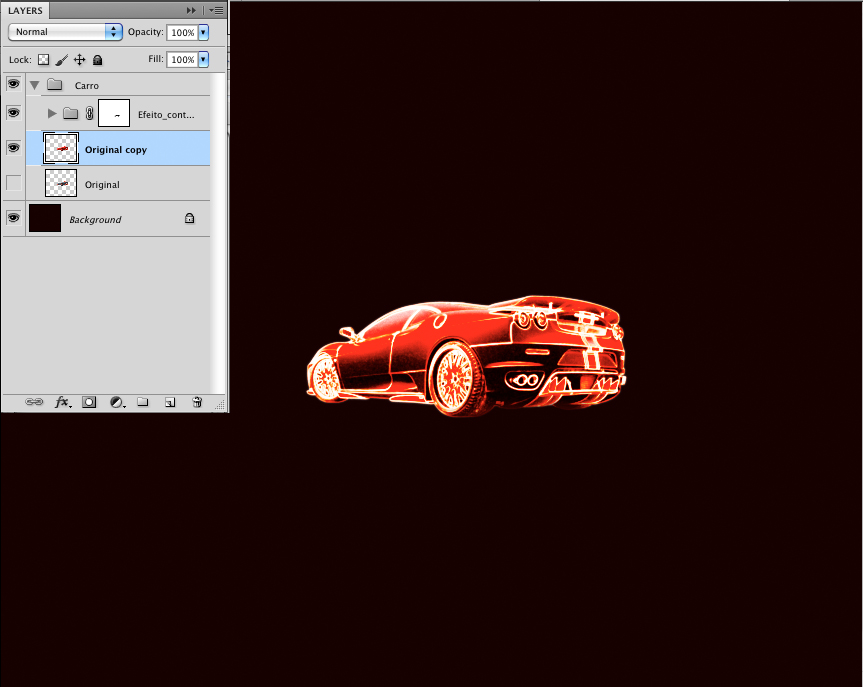
Our effect is pretty much done. Now let's duplicate the original layer that we hid on the step 1. Select it and go to Image>Adjustments>Hue an Saturation. Select colorize and change the Saturation to 100. Put this layer in a folder and rename it to Car.
Reader Tutorial: Flaming Car by Lincoln Soares

Step 5

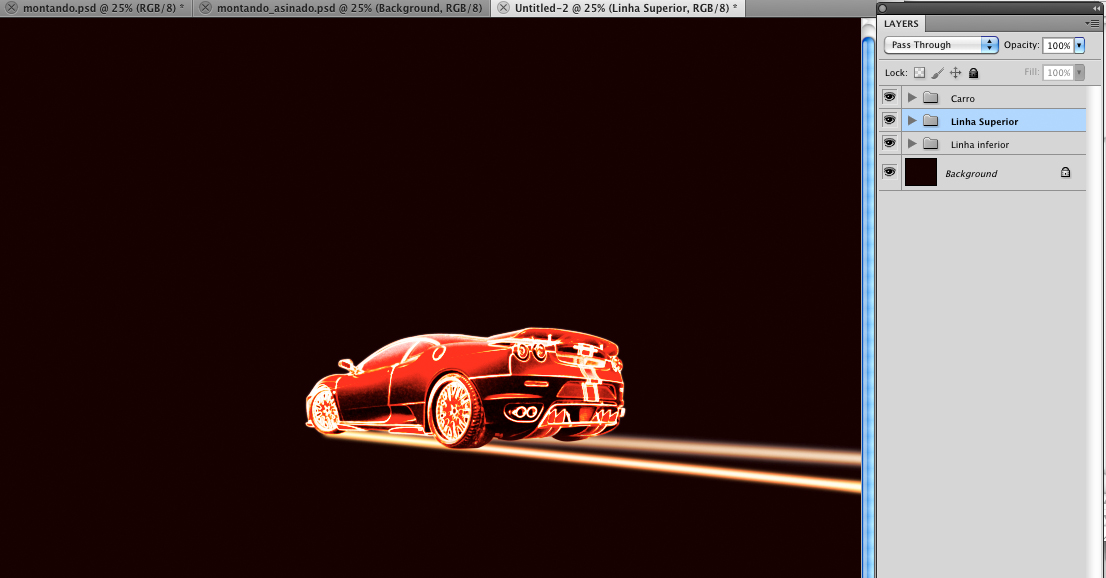
Add a new layer and name it "Superior Line" before starting adding flames and other light rays. With the Brush Tool (B) with Hardness 0 add a line following the tires skid marks and go to Filter>Blur>Gaussian Blur. I used 4.5 pixels for the radius. After that go again to Image>Adjustments>Hue and Saturation. Use +76 for the Hue. Tip: You will have to do that for the right side tires and the left ones as well.
Reader Tutorial: Flaming Car by Lincoln Soares

Step 6

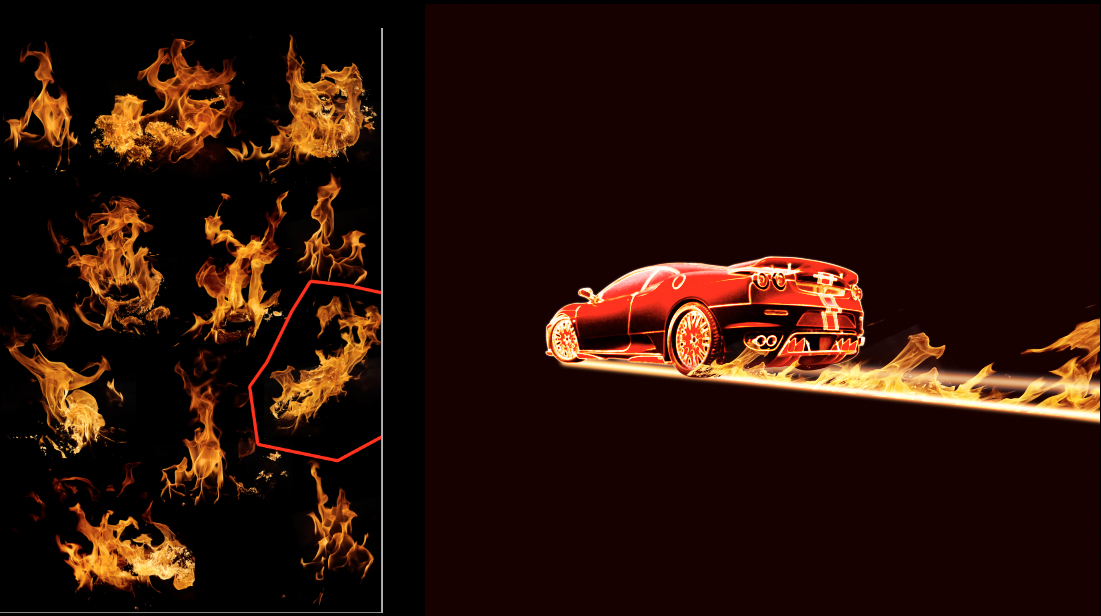
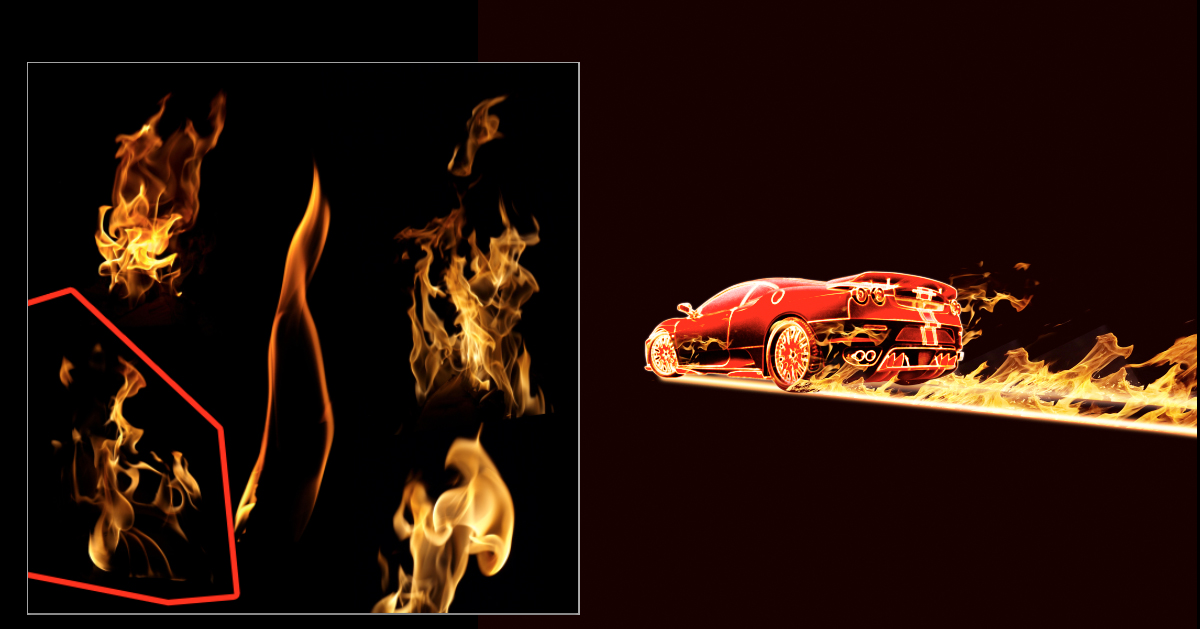
Now let's start mixing some images in our composition. Get some flame images ad start adding them in your image. Notice that the flame images I have they are all in black background, that way you can use Screen for the Blend Mode and the black will be transparent.
Reader Tutorial: Flaming Car by Lincoln Soares

Step 7

Keep adding more flames.
Reader Tutorial: Flaming Car by Lincoln Soares

Step 8

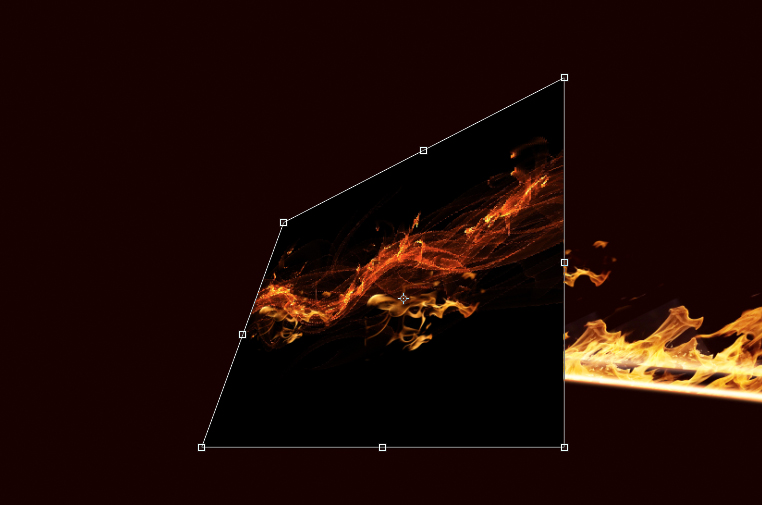
Here I added another flame image. You can change the perspective of the image by going to Edit>Transform>Perspective. Once again use Screen for the Blend Mode, and if you wan the effect to be stronger, just duplicate the layer.
Img8
Reader Tutorial: Flaming Car by Lincoln Soares

Step 9

Select one of the flames that you used for the skid mark and move it so it is underneath the car. Do that for the front and rear part of the car.
Reader Tutorial: Flaming Car by Lincoln Soares

Step 10

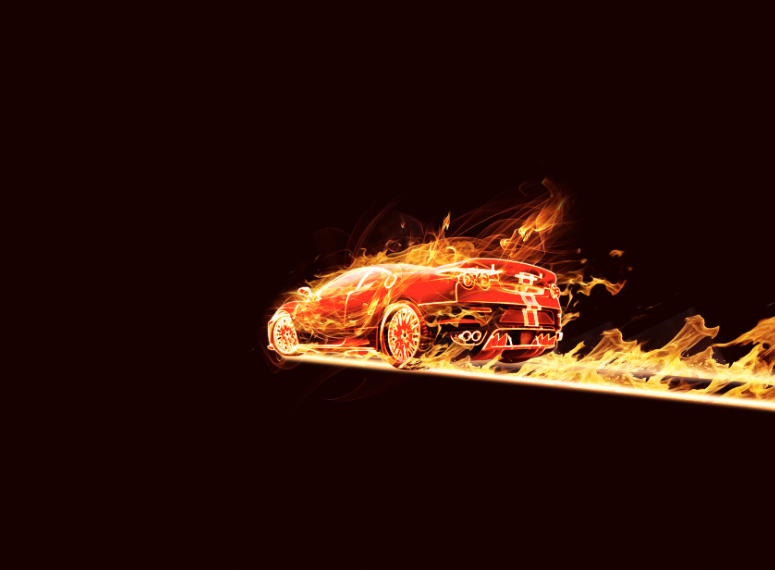
Almost done. Let's add a few more details. Add a new layer and then with the Brush Tool (B), use a rounded brush with 0% Hardness to create some little spots of fire following the skid marks. Make sure you use different sizes for the spots like the image below.
Reader Tutorial: Flaming Car by Lincoln Soares

Step 11

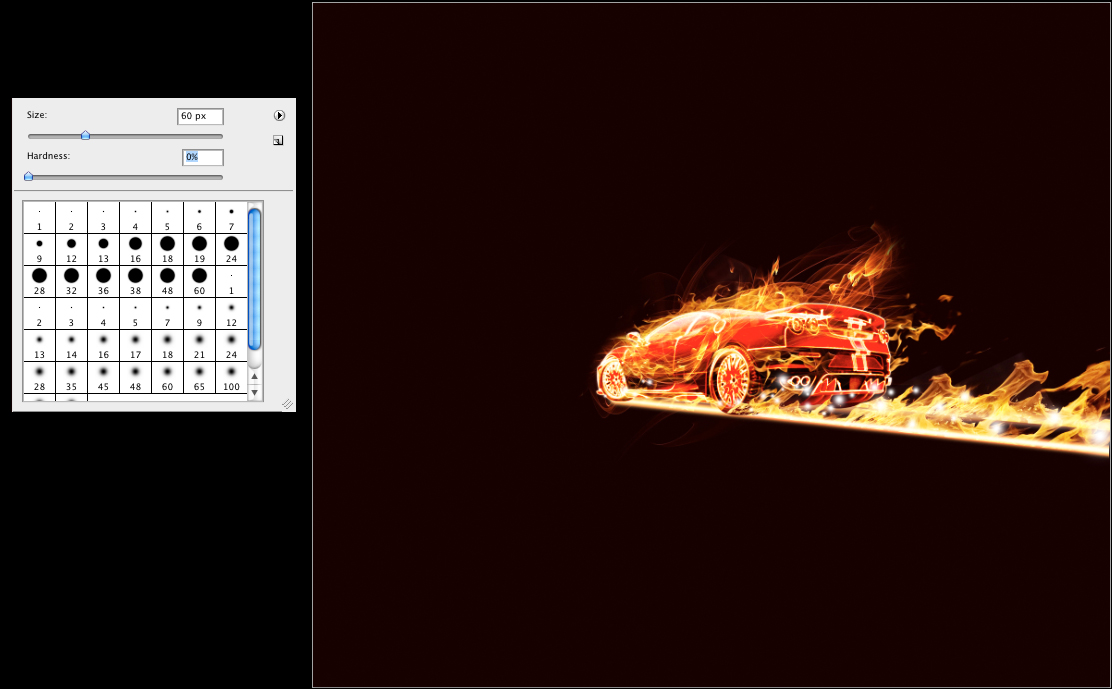
Duplicate the layer and go to Image>Adjustment>Hue and Saturation. Select Colorize and change the Saturation to 100 and the Lightness to -50. After that change the Blend Mode to Overlay. Duplicate that layer again and go to Image>Adjustments>Hue and Saturation. Change the Hue to 76.
The next thing here is add an image of smoke like the image below.
Reader Tutorial: Flaming Car by Lincoln Soares

Conclusion

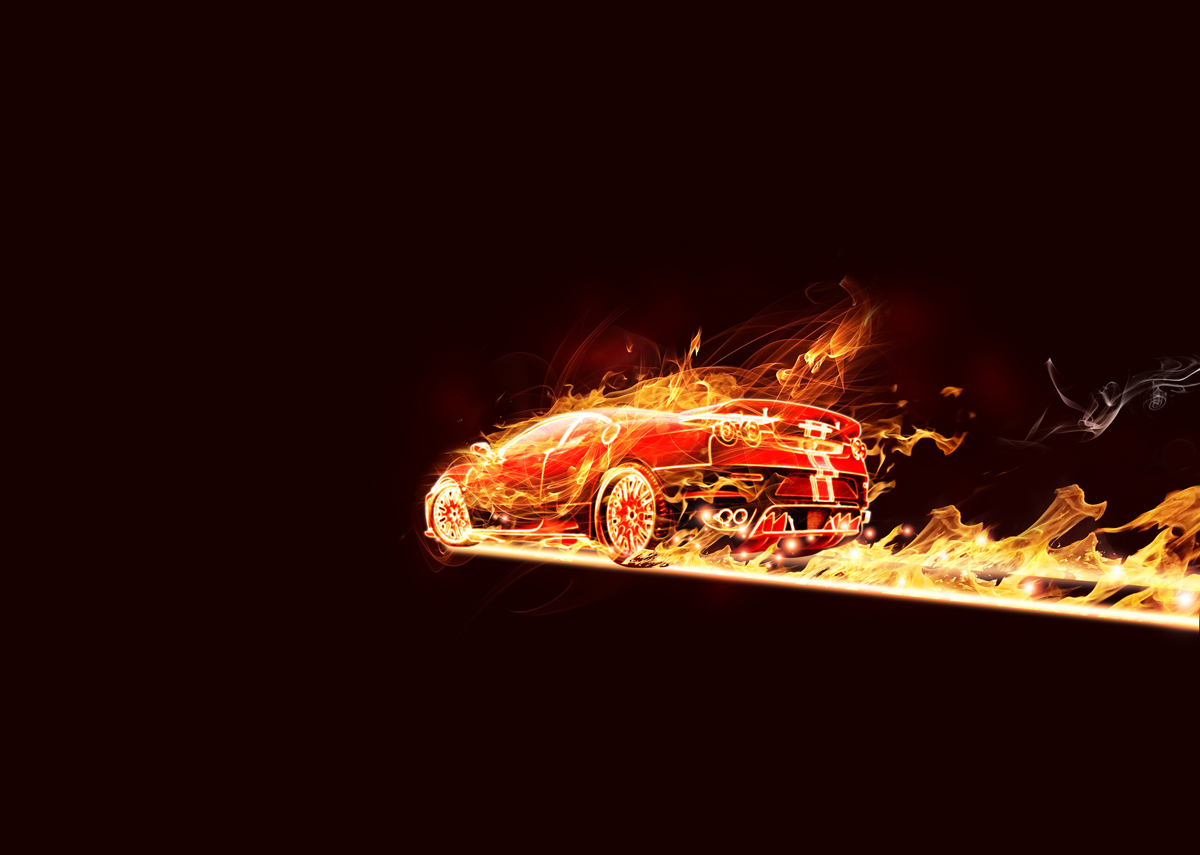
That's it, our image is done. It takes a little time and work but the technique is quite simple. The end result is quite nice as well. I also hope you liked my first tutorial here at Abduzeedo. If you have any questions or want any asset I use here you can reach me at mr.jons60@yahoo.com
I am very happy to contribute with Abduzeedo, a blog that has helped me quite a lot.
Reader Tutorial: Flaming Car by Lincoln Soares

Download Photoshop File

4 November 2011

Beberapa jenis "Text Effects" yang menarik - Tutorial Photoshop

16 Oktober 2011

DOWNLOAD ADOBE PHOTOSHOP CS6 TERBARU 2011 + SERIAL NUMBER

DOWNLOAD ADOBE PHOTOSHOP CS6 TERBARU 2011 + SERIAL NUMBER

photoshop cs6, photoshop cs6 full verasion – bagi anda yang senang dengan editing foto pasti udah tidak asing lagi dengan adobe photoshop, nah kali ini adobe photoshop merilis versi terbarunya yaitu adobe photoshop cs6 keren kan..!
yaudah kita download ajah langsung.
adobe photoshop cs 6
Persyaratan Sistem :
*Intel Pentium 4 atau AMD Athlon 64 processor
*Microsoft Windows XP dengan Service Pack 3; Windows Vista Home Premium
*1GB RAM
*1GB ruang hard-disk yang tersedia untuk instalasi
*1024×768 display (1280×800 disarankan
*QuickTime 7.6.2 lunak yang diperlukan untuk fitur multimedia
Serial Number Photoshop CS6 Terbaru
1330-1971-4830-5668-6067-1762
1330-1912-2628-0850-0232-4869
1330-1148-0472-2735-6555-0617
1330-1544-4195-8131-3034-5634
1330-1886-0283-4688-9152-2034
1330-1118-3174-6558-8260-5378
Semoga artikel Free Download Adobe Photoshop CS6 Terbaru 2011 + Serial Number ini bisa bermanfaat bagi agan-agan semua yang lagi mencarinya. Bagi yang mau download Photoshop CS6 terbaru 2011 ini silahkan klik disini atau download pada link dibawah ini, terserah anda semua mau download via yang mana saja tinggal pilih salah satunya.
Download Via Hotfile
http://hotfile.com/dl/84680865/904a4b6/AP6CS-bymagsterfgh.part1.rar
http://hotfile.com/dl/84681396/2b9088d/AP6CS-bymagsterfgh.part2.rar
http://hotfile.com/dl/84681791/d053bcb/AP6CS-bymagsterfgh.part3.rar
http://hotfile.com/dl/84682287/76388bc/AP6CS-bymagsterfgh.part4.rar
http://hotfile.com/dl/84683175/2d4e09a/AP6CS-bymagsterfgh.part5.rar
http://hotfile.com/dl/84684040/bad56f5/AP6CS-bymagsterfgh.part6.rar
http://hotfile.com/dl/84684831/393dcbe/AP6CS-bymagsterfgh.part7.rar
http://hotfile.com/dl/84685078/e52bacd/AP6CS-bymagsterfgh.part8.rar
Download Via Easy-Share
http://www.easy-share.com/1913078953/AP6CS-bymagsterfgh.part1.rar
http://www.easy-share.com/1913078954/AP6CS-bymagsterfgh.part2.rar
http://www.easy-share.com/1913078998/AP6CS-bymagsterfgh.part3.rar
http://www.easy-share.com/1913079028/AP6CS-bymagsterfgh.part4.rar
http://www.easy-share.com/1913079030/AP6CS-bymagsterfgh.part5.rar
http://www.easy-share.com/1913079462/AP6CS-bymagsterfgh.part6.rar
http://www.easy-share.com/1913078962/AP6CS-bymagsterfgh.part7.rar
http://www.easy-share.com/1913078959/AP6CS-bymagsterfgh.part8.rar
Download Via Fileserve
http://www.fileserve.com/file/cCbmHk6/AP6CS-bymagsterfgh.part1.rar
http://www.fileserve.com/file/7kkfyYp/AP6CS-bymagsterfgh.part2.rar
http://www.fileserve.com/file/yWr7Ck2/AP6CS-bymagsterfgh.part3.rar
http://www.fileserve.com/file/5xNXy5C/AP6CS-bymagsterfgh.part4.rar
http://www.fileserve.com/file/5Xk6CJ3/AP6CS-bymagsterfgh.part5.rar
http://www.fileserve.com/file/kgkNee3/AP6CS-bymagsterfgh.part6.rar
http://www.fileserve.com/file/TH32VTM/AP6CS-bymagsterfgh.part7.rar
http://www.fileserve.com/file/AjwKFgD/AP6CS-bymagsterfgh.part8.rar
Selamat mendownload-download ria.

11 Oktober 2011

membuat poster animasi gokil abis dengan photobie

satu lagi software untuk membuat animasi, dan tentunya gokil abis shop. berikut beberapa contoh yang dihasilkan dari software yang satu ini namanya photobie. dan ini tidak seperti animasi yang terdahulu yang pernah posting, biasanya saya memakai gambar atau foto sendiri, tapi berhubung saya lagi kesel ma diri sendiri, jadi males ngelihat fotonya, hehhehehh.........

ilmu ini saya dapat dari avianet[dot]wp. sobat bisa menghasilkan animasi tergokil dengan kreatifitas masing-masing, ojo kaya aku, iki cuman copas. hhheheee.....

ronaldo2

sebelum

ronaldo22

sesudah

caranya :

• Open image (pilih gambar yang akan diedit ).
• Masuk ke Layer manager , copy curent layer , paste single copied layer .
• Klik Filter , Almathera , A.Warper , warpfactor (7) , ok (1:background)
• masuk ke layer manager , copy curent layer , paste single copied layer .
• Klik Filter , Almathera , A.Warper , warpfactor (7) , ok (2:background )
• masuk ke layer manager , copy curent layer , paste single copied layer.
• Klik Filter , Almathera , A.Warper , warpfactor (7) , ok (3:background )
• lanjutkan terus sampai 9:Background.
• Selanjutnya , arahkan ke 8:Background , copy curent layer , paste single copied layer ( 10:Background )
• Arahkan ke 7:Background , copy curent layer , paste single copied layer (11:Background).
• Arahkan ke 6:Background , copy curent layer , paste single copied layer (12:Background)
• Begitu seterusnya sampai 17:Background.
• Selanjutnya klik Gif animation , animation control panel , play animation.
• Save animation ( *.gif)

contoh laen.

bintang

sebelum

bintang211

sesudah

caranya :
• Open image (pilih gambar yang akan diedit ).
• Masuk ke paint/Selection ( sebelah kanan )
• Klik Air Brush Tool .
• Masuk Color palette (pilih warna yang anda inginkan ) , klik .
• Arahkan mouse ke gambar .
• Klik kiri ( mouse )jangan dilepas ( sapu terus dai kiri kekanan terus merata sampai ke bawah ) .
• Kalau sudah merata sampai ke bawah , lepas mouse terbentuk 1:new layer .
• Pilih warna lagi ( warna lain ) , sapukan lagi ke gambar seperti diatas
• Ulangi lagi sampai 3 kali.
• Klik Gif Animation , animation control panel , play animation , save animation ( *.Gif )

dan masih banyak lagi hasil yang bisa didapatkan dan tentunya lebih gokil.

met mencoba.
salam kreasi

download orb : photobie

Photoshop CS4 Portable


Photoshop_Portable_11 SOFWARE GRATIS - Ini sangat berguna sekali bagi yang suka meng-edit foto,walpaper,dan gambar lainnya, kemampuan software ini sebagai image editor sangat tidak diragukan lagi dalam pengeditan gambar, apalagi software ini adalah aplikasi yang bisa dibawa kemana-mana dan praktis dengan Flashdisk anda, karena ini versi Portable yang siap pakai, Software ini banyak digemari oleh pengguna IT manapun,...
Fiturnya :
- Bisa mengatur gambar dengan banyak pilihan menu.
- Mempunyai banyak effek, seperti effek kaca,bayangan,kartun,blur,noise dan masih banyak.
- Bisa menyimpan file bertipe jpeg,bmp,png,tiff,targa,pbm dan lain - lain.
- Memaksimalkan kualitas gambar.
- Mampu meng-edit dengan details.
- Mampu memotong,duplicate,transparan gambar.
- Aplikasi portable.
Photoshop CS4 Portable | File Size 52.6 MB
Download Here

4 Oktober 2011

Great Gooey Photoshop Text Tutorial

Create great looking, 3-Dimensional, gooey looking text . This technique does require minimal drawing skills but is definitely suitable for beginners. Enjoy and stay tuned for more tutorials!

gooey-photoshop-text-tutorial

Gooey Photoshop Text Tutorial

Step 1 – Canvas
It’s important for this tutorial that you set up the same size canvas as the effects we’ll apply will vary depending on how many pixels it’s across. To use in smaller or bigger projects you will need to tweak the settings applied throughout this tutorial. Set up a 2500 X 1500 pixel, RGB document at 300dpi.
11
Step 2 – Texting
Select the Horizontal Type Tool, set the colour to a lightish grey and write your word. It’s best to use a fairly uncomplicated and bold font, I’ve gone for Avant Garde in Bold. Adjust the tracking to 50 as we’ll need space in between letters to allow for gooey growth. Press CTRL+T or go to Edit > Free Transform and resize your text by holding the SHIFT key (to maintain aspect ratio) and pulling one of the corner points with the mouse.
2
Step 3 – Ready the Tools
Select the Pen Tool and set it Shape Layers. Set the foreground colour to 40C, 10M, 100Y, 0K. Zoom into 100% and you are now ready to draw.
3
Step 4 – Drawing
Draw your first point at the start of the first letter. The best way to draw a curve is to position one anchor point at the origin of the curve and one at the end point or point at which the curve changes. To split an anchor point you hold the ALT key and click on the last drawn anchor point. This will delete the outward part of the handle and allow you to draw another one in (on the same anchor point) at any angle without altering the direction of the inward handle. This splitting technique allows for sharp angles following a curve.
4
Step 5 – Editing your points
Continue drawing loosely around the shape, adding some drips at the bottom to mimic gravity. Use the Direct Selection Tool (Behind the Path Selection Tool if you hold the mouse button) to manipulate the anchor points and the curve handles. In order to create an elongated bulbous end at the bottom of a drip you’ll need to pull the bottom facing handles out further. At any point if you’re not happy with the position or angle of your point, you can manipulate it with the Direct Selection Tool.
5
Step 6 – Best foot forward
I find it’s easier to draw the drips from top to bottom (following the gravitational pull) so once you hit the bottom of the letter, use the Direct Selection Tool to click anywhere on the canvas. Then select the first point (at the top of the letter) with the Pen Tool and draw in the rest. Something I forgot to mention earlier is to set the fill at 80% so you can see the letter underneath.
6
Step 7 – Subtracting
To get the hole in letters such as ‘O’ or ‘A’ you’ll need to set the Pen Tool to Subtract from shape area. Draw the outer shape of the ‘O’ and close off the path. Select the path thumbnail so that it highlights the path, set the Pen Tool to Subtract from shape area and draw in where the hole should be.
7
Step 8 – Finishing off
Complete the rest of the letters and set the Fill for each layer at 100%.
8
Step 9 – Inner Shadow
Select the ‘G’ layer and go to Layer > Layer Style > Inner shadow and setup as in the screen grab.
9
Step 10 – Inner Glow
Working on the same layer, select the Inner Glow setting and setup as in the screen grab.
10
Step 11 – Bevel and Emboss
Do the same with the Bevel and Emboss…
11
Step 12 – Satin
…And finally Satin.
12
Step 13 – Copy and paste
Select the ‘G’ layer and go to Layer > Layer Style > Copy Layer Style. Select the remaining letter layers and go to Layer > Layer Style > Paste Layer Style.
13
Step 14 – Ol’ Drippy
Draw in more drips on top of the letters. Copy and paste the Layer Style as before and go to Layer > Layer Style > Scale Effects… scale them back to fit the size of the drip, in this case it’s 40%. Then go to Layer > Layer Style > Inner Glow and scale the opacity back to 60%.
14
Step 15 – Rasterize and Mask
Create a new layer directly below the new drip you just drew. Select the drip and the blank layer and merge them (Layer > Merge Layers). Add a Layer Mask (Layer > Add Layer Mask > Reveal All) and use a soft-edged paintbrush loaded with black to mask off the top of the drip. Repeat this process until you’ve covered the word.
15
Step 16 – Depth
To add depth, draw some more drips beneath the letter layers. Copy, paste and scale the layer effects to save time.
16
Step 17 – Texture
It’s a good idea to add texture to the final text to make it feel more ‘real world’. You can either overlay an easily downloadable grunge texture or try the following method: Go to Filter > Noise and add a 2 pixel noise filter. Then go to Filter > Blur Gaussian Blur and apply a 0.6 pixel blur.
17

LOGIN

Template by : JON'S